

How To Install A Humidifier On Your Furnace
Dan has been in the HVAC industry for 23 years with feel ranging from installation and service to sales and distribution.
Introduction to Habitation Humidification
Adding a whole-house humidifier to your heating and ac system is a project you can exercise yourself to better your air quality and comfort.
These like shooting fish in a barrel-to-follow, step-past-footstep instructions and photos will prove you how to install, operate, maintain and sympathize your furnace humidifier, using an Aprilaire 600M unit as an example.
In this article:
- Thinking About Ownership a Whole-House Humidifier?
- Benefits of Humidifiers
- What You Need for Installation (Materials/Tools With Photos)
- Where to Install a Humidifier
- 12-Step Humidifier Installation Guide (With Photos)
- Setting and Controlling Your Humidity Level
- Basic Humidifier Maintenance and Parts
- Conclusion
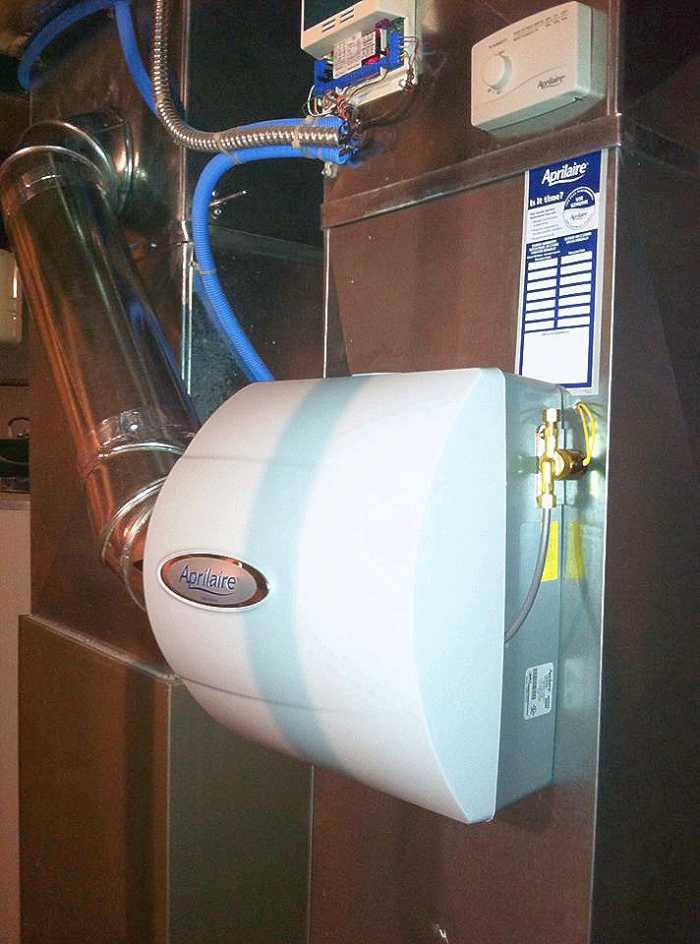
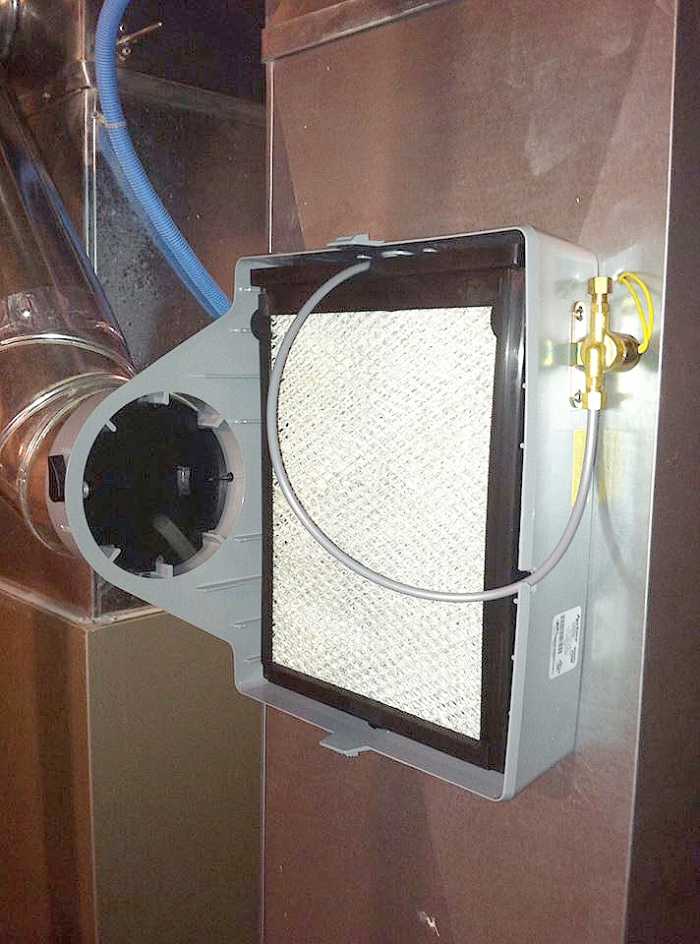
Aprilaire humidifier installed.
Cre8tor
Thinking Near Buying A Whole-House Humidifier?
The toll of having a heating and cooling professional install a humidifier tin exist unreasonable. If you're doing it yourself, yous can expect to spend around $250 for the unit and the necessary installation materials. Fifty-fifty if you have to purchase a tool or ii, information technology's worth it: if you have an HVAC contractor perform the installation for you lot, the cost will in the neighborhood of $400-$500, if not more.
The whole-firm humidifier pays for itself. There are countless benefits, listed below.
Benefits of Humidifiers
| Health | Comfort | Value |
|---|---|---|
| Significantly reduces the corporeality of airborne dust in the dwelling, thus reducing the suffering of those with allergies. | Lowers or fifty-fifty eliminates static electricity. | Save on free energy bills—your furnace works harder to oestrus dry air. |
| Deters the spread of viruses that thrive in drier environments. | Reduces snoring | Wood floors and cabinets will maintain their appearance and last longer. |
| Prevents peel from drying and itching and lips from chapping | Helps go along house plants salubrious—looking at dying plants doesn't conduce a feeling of comfort. | Increases home value—humidifiers are rather inexpensive but add together value to your HVAC system, thus your domicile. In this way, they will more than pay for themselves. |
What Yous Need for Installation
Now that we've decided adding a humidifier is a practiced and affordable idea, allow's get started with installing a unit ourselves using a rather basic Aprilaire humidifier as an instance. If yous're going to hire a heating and cooling service provider for your install, perhaps yous'll want to skip downwardly to the maintenance and humidity control sections of this page.
Materials
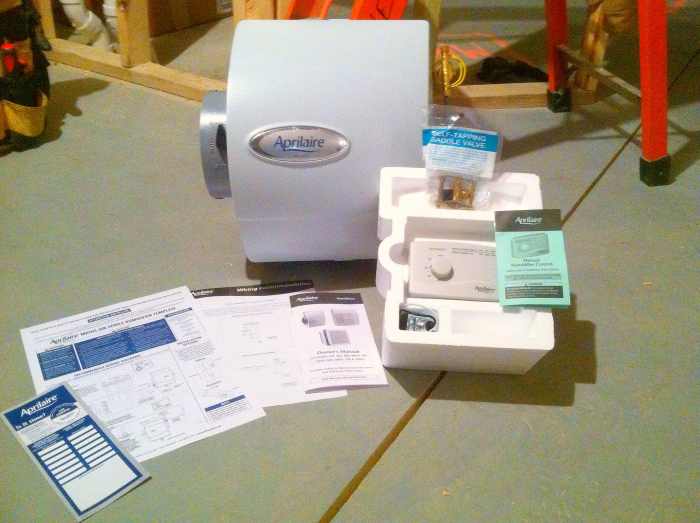
- Aprilaire Humidifier Kit (recommended) – Confirm the model is sized properly for your abode.
Each kit comes with:
- Unit of measurement with filter/panel and born damper
- Transformer (110v/24v)
- Saddle valve (to tap into existing hot h2o piping)
- Humidistat (humidity control)
- Installation template (for fitting the unit of measurement and humidistat)
This humidifier kit gets you started but yous'll still need a couple items to go with it.
Cre8tor
- 3/four" PVC pipage – ten' should be sufficient if you have an A/C or furnace drain you can tap into.)
- iii/4" PVC fittings – 1-tee, 4-90o elbows, 2-45o elbows, and 1-coupling should do, in nearly cases.
- PVC cement – Very little is required and can exist substituted with a waterproof silicone.
- Pocket-sized wire nuts – Small and usually blueish. Six would be the almost y'all'll employ
- ii spade terminal connectors – These are usually modest and blue.
- one" sheet metal screws – 6-10 should be fine.
- 1/2" sail metallic screws – 10 or and so should practice.
- 18/2 thermostat wire – This is low voltage wire (24V).
- Foil or duct tape – Again, very little is needed.
- i/4" copper tubing – The required length will be the distance from the humidifier to the nearest hot water line.
- eighteen/2 thermostat wire – This is depression voltage wire (24V).
- 6" circular warm air pipe – You'll need a 5' pipe.
- one–6" take off – A vi" start neckband and elbow could exist used instead.
- vi" adjustable elbows – Depending on your set upwardly, you'll demand no more than three.
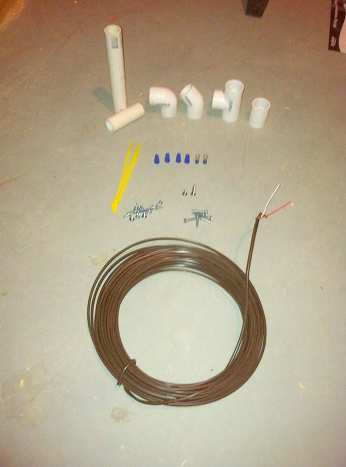
PVC piping and fittings, wire nuts, spade terminals, screws, wire ties, and thermostat wire.
Scroll to Go along
Read More From Dengarden
Annotation: Yous may merely need some of these, depending on the humidifier you're installing. You may observe that you already have tools that can exist used every bit substitutes for some of these HVAC specialty tools. Before you purchase any of these items, perhaps you should appraise your installation compared to this example.
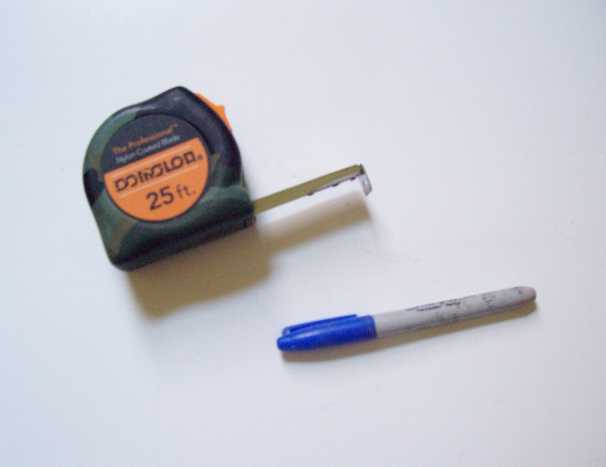
- Record measure
- Mark
- Hammer
- Flathead and Philip's screwdriver
- Cordless (battery-powered) drill and 1/4" hex driver
- Tin can snips
- Pliers – You volition want ii pairs of standard pliers or channel locks.
- Torpedo level
- Tubing cutter
- Awl
- Crimping tool
Where to Install a Humidifier
Before we start cut holes into our ductwork, nosotros need to decide where we're going to install our humidifier. Your options may be limited past your existing heating and cooling system setup. Again, I suggest yous follow this instance installation to the terminate to have a good agreement of what y'all volition be doing and so make your determination.
Here are a few things to go on in mind—I've applied them to this home humidifier install.
- Mount the unit on the return air duct whenever possible. You can mount to the supply side, but the system works much better on the render side and poses less of a threat to your furnace, should at that place ever be a malfunction involving water and electrical components.
- Make certain there is enough room above the unit to mount your humidistat. Information technology'southward suggested to be at least 6" above the unit.
- Try to make the bypass connection as curt and straight as possible.
- Aprilaire units are able to be flipped around and then that the featherbed can be on either side.
- Be certain you have room to remove the unit'southward cover, water pad/panel, and other parts for easy maintenance and repair in the future.
- Visualize your bleed path to be certain you lot'll be able to maintain a downwardly slope towards its destination. This ensures proper drainage and prevents stagnant water from building up in the line. Again, the shorter, the meliorate.
Without further filibuster, allow'south kickoff installing our humidifier!
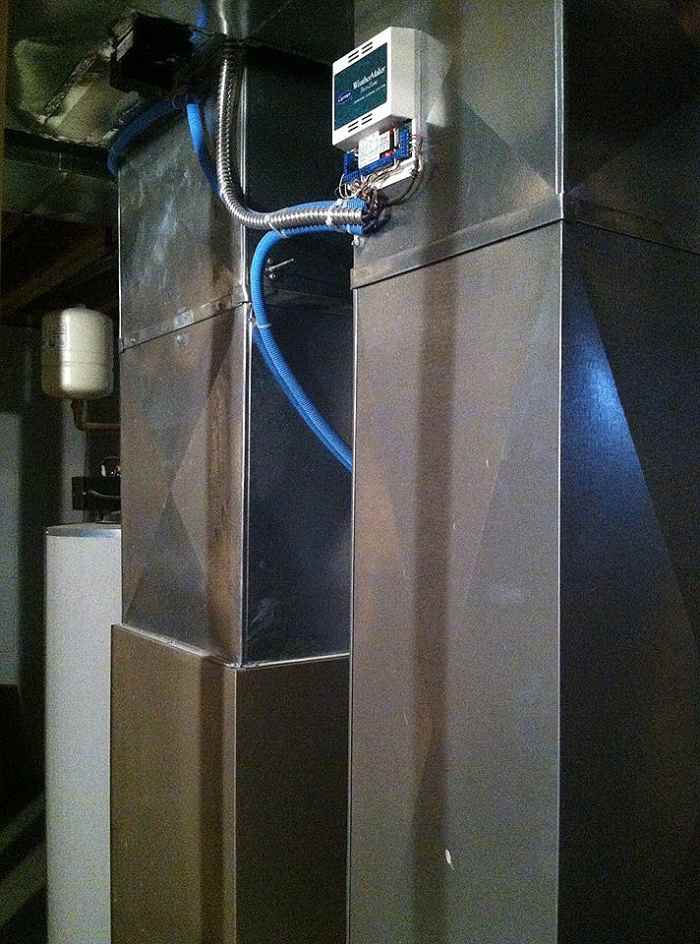
Location is of import. This is a very like shooting fish in a barrel set-up ,and clearly, I will mount the unit to the return air on the right and bypass to the dorsum of the plenum.
Cre8tor
12-Step Humidifier Installation Guide (With Photos)
A pic is worth a thousand words, so why don't I keep this equally unproblematic as possible? Beneath, I've listed the steps for my Aprilaire 600M installation case, but y'all don't lose anything to your imagination, I've provided pictures to get along with these steps. The two combined should requite you lot a very articulate sense of how to install your ain humidifier.
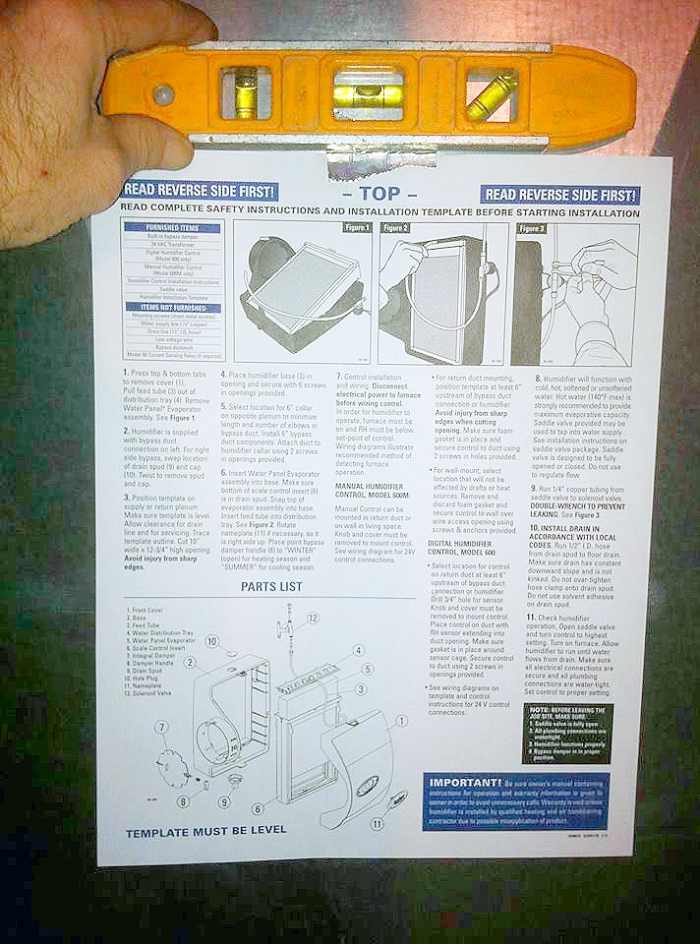
1. Level and trace your humidifier template onto your return air duct.
Cre8tor
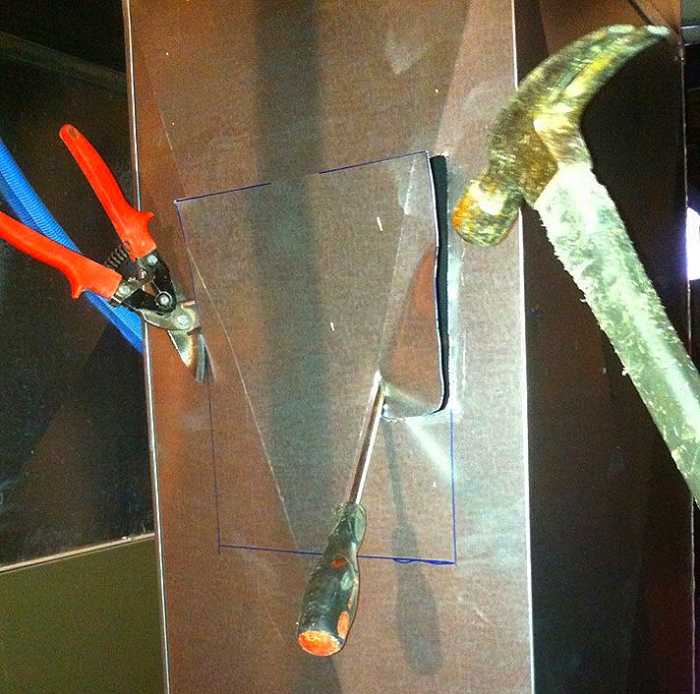
2. Make a slit in the duct just within the blueprint almost 3" long.
Cre8tor
- Identify your flat caput screwdriver against the duct at a slight bending and hammer it into the metal.
- Alternatively, you may want to drill a screw in the duct and remove it for an easier kickoff.
- Twist the screwdriver to pry the slit open a niggling so that you lot can starting time your snips for the next step.
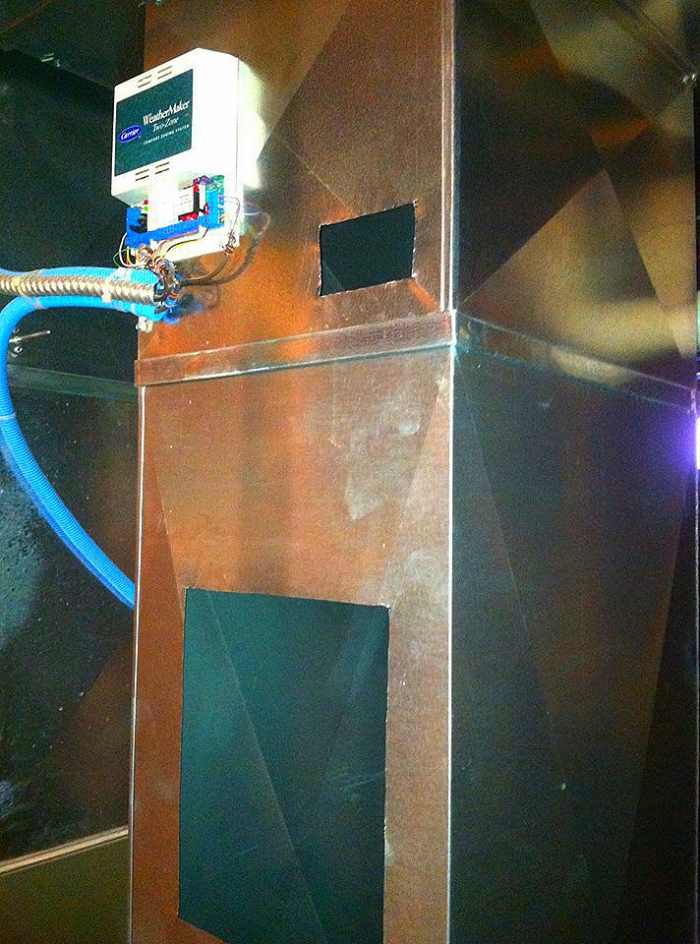
iii. Cut out the humidifier and humidistat patterns.
Cre8tor
- Place the humidistat 6" above where the humidifier will exist. It does non accept to be located on the aforementioned side of the render air duct.
4. Mount the humidifier casing and control trunk.
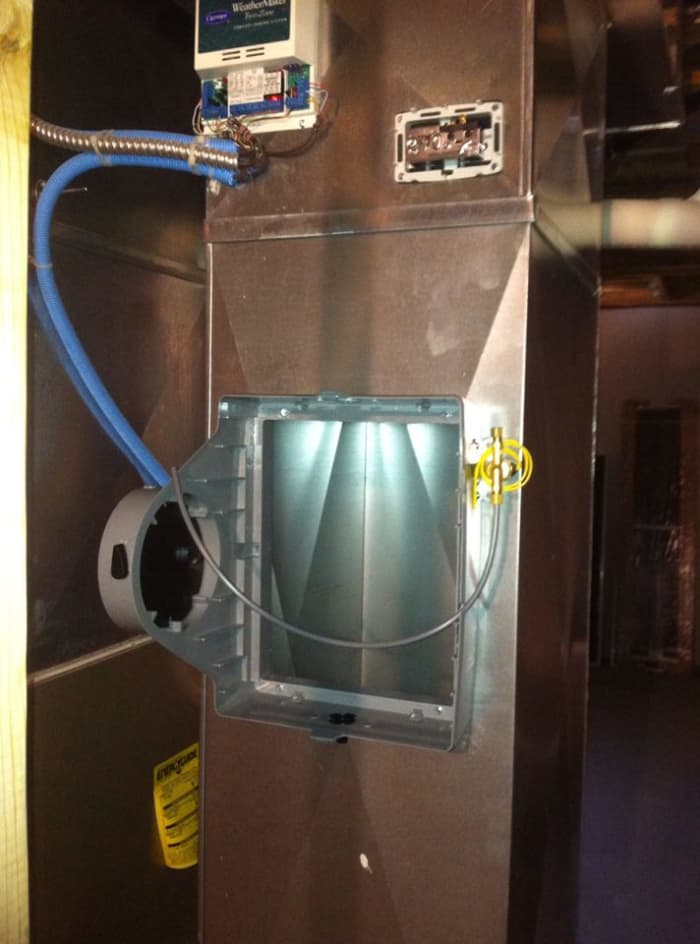
Superlative left: the control for this system'due south zoning. Top right: control body. Bottom: humidifier casing.
Cre8tor
- Remove the embrace and h2o pad from the humidifier and place the casing into the cutout on the duct.
- Using 1" long sheet metallic screws, mount the casing to the duct by running screws through the provided holes in the casing.
- This Aprilaire unit of measurement requires 6 screws. Pull off the control knob so that you tin can pull the facing off of the main control body.
- Using four ane/two" long canvas metal screws, fasten the command body to the duct in the pigsty you cut. Don't forget the foam gasket that goes between the humidity control body and the duct.
5. Locate, trace, cut out, and install the six" take off on the supply duct for your bypass.
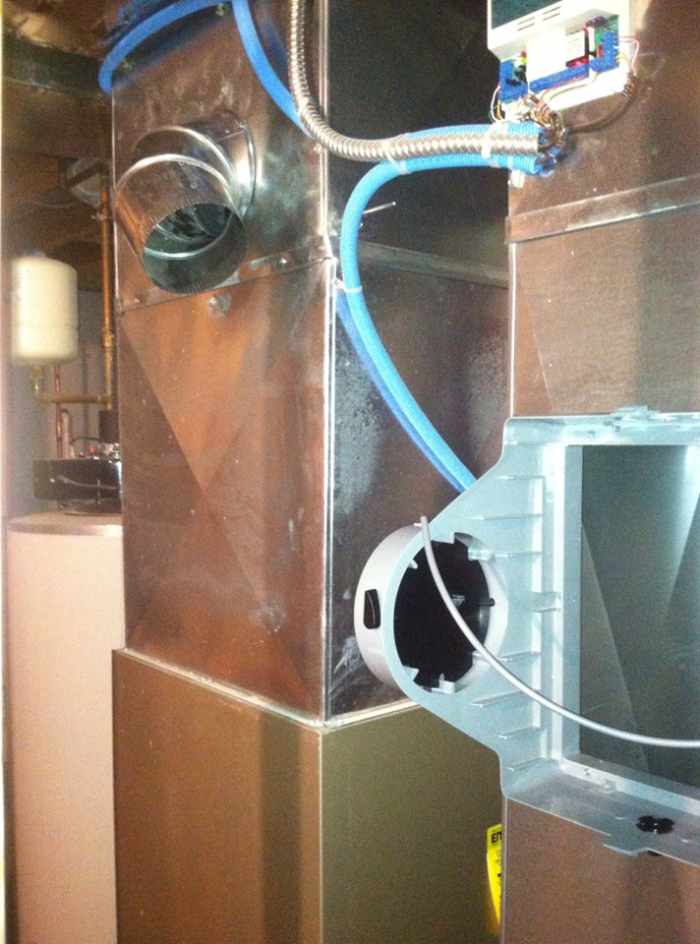
The take off is installed at the acme left in this photo. Notice how it's in a higher place the coil and facing the humidifier casing.
Cre8tor
- Remember, the shorter and straighter the bypass, the better.
- Warning: If you lot have air workout, avoid mounting the take off correct on the curlicue example, and if that's the just place you lot can identify it, definitely don't pierce a hole in the coil when cutting into the duct.
- At present, slide the teeth of the take off or collar into the hole and fold them over to lock it in identify.
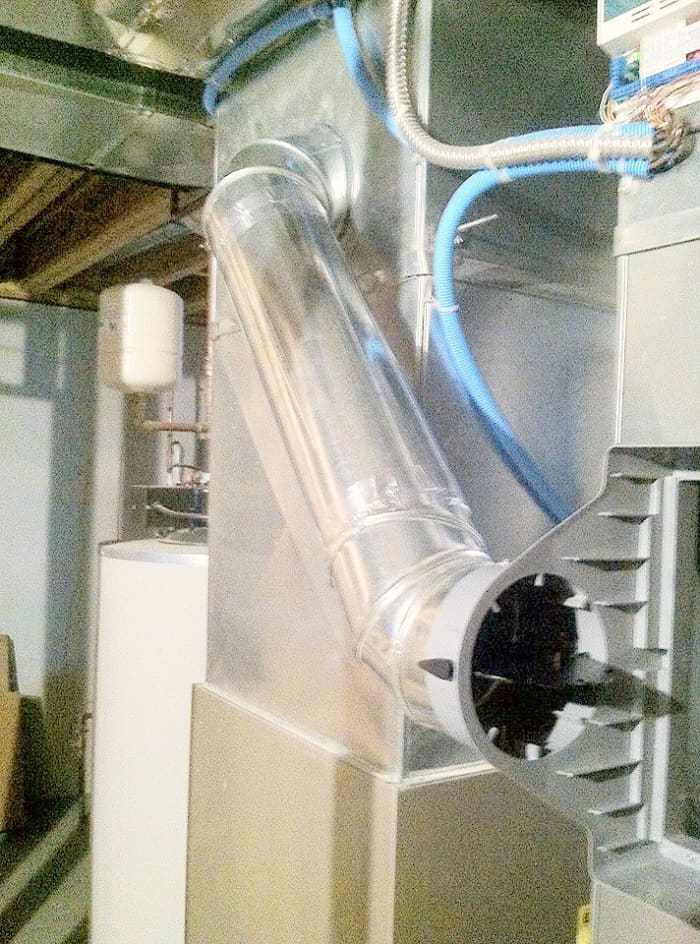
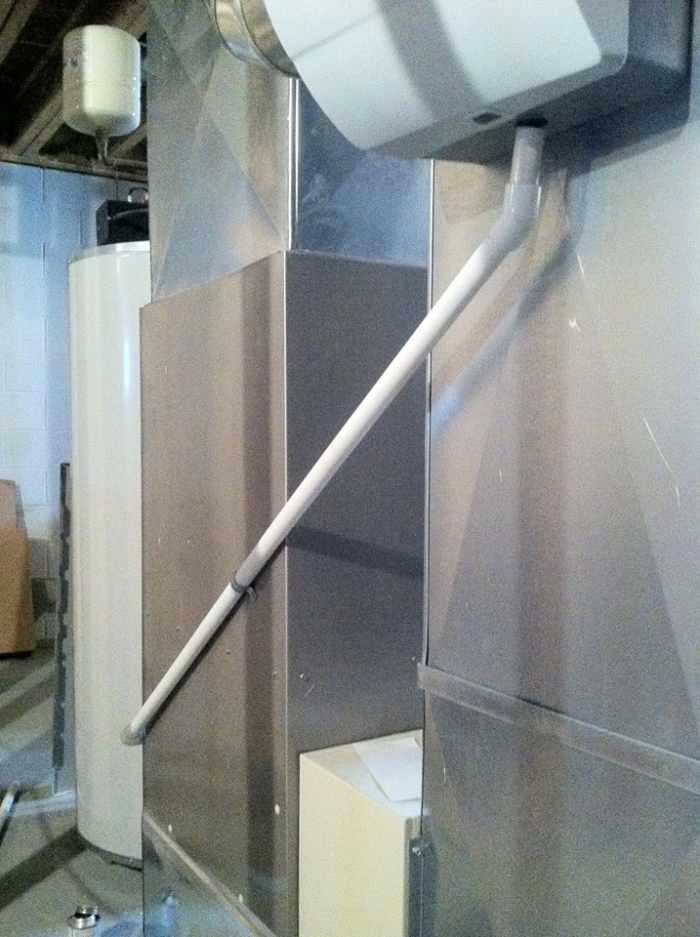
6. Install the featherbed pipage.
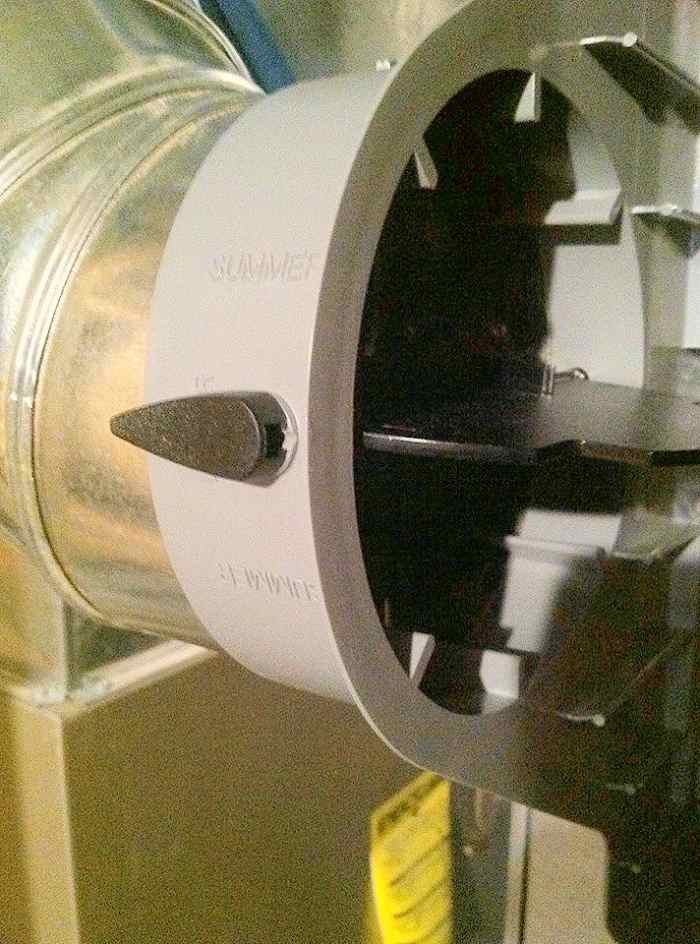
Install the 6" elbow to the casing. Be certain the featherbed damper can swing.
Cre8tor
- Your path may vary from mine—just proceed in mind that you want to have the path of least resistance when possible.
- Connect your vi" elbow to the humidifier casing with 2 1" screws. The casing has holes at the peak and lesser of the damper connection for this. Make certain yous suit the elbow first and check that the damper tin can swing freely.
- When cut straight pipe sections, measure from the edge of point A to the edge of point B and add an extra 3" for your connections.
- Equally y'all consummate each connexion, wrap record around them, and install 2 one/2" screws in each, across from each other.
- If information technology's summer, close the damper. If information technology's winter, leave it open.
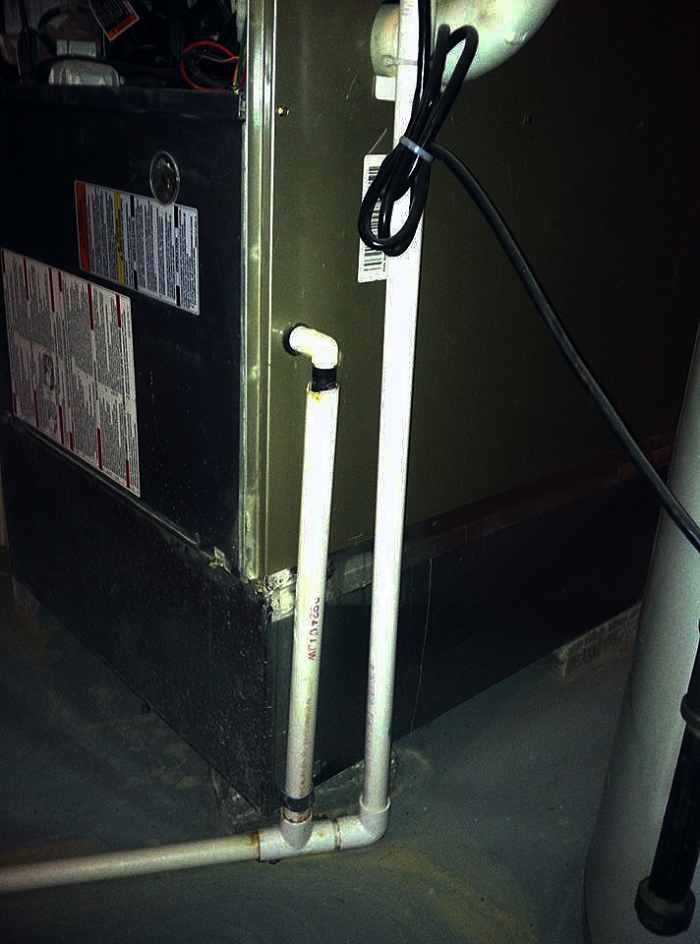
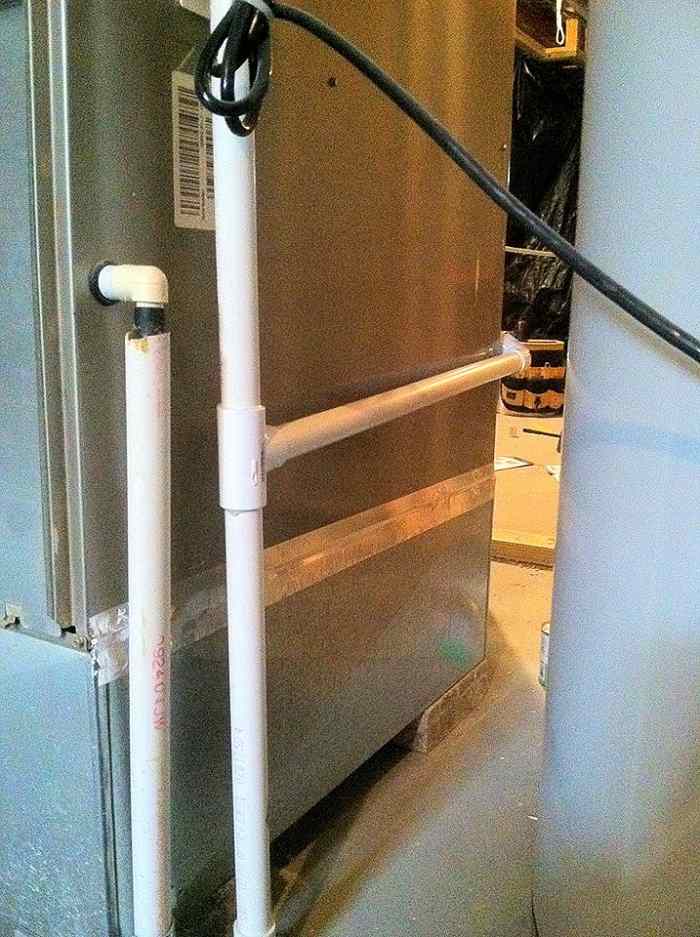
7. Install the drain piping.
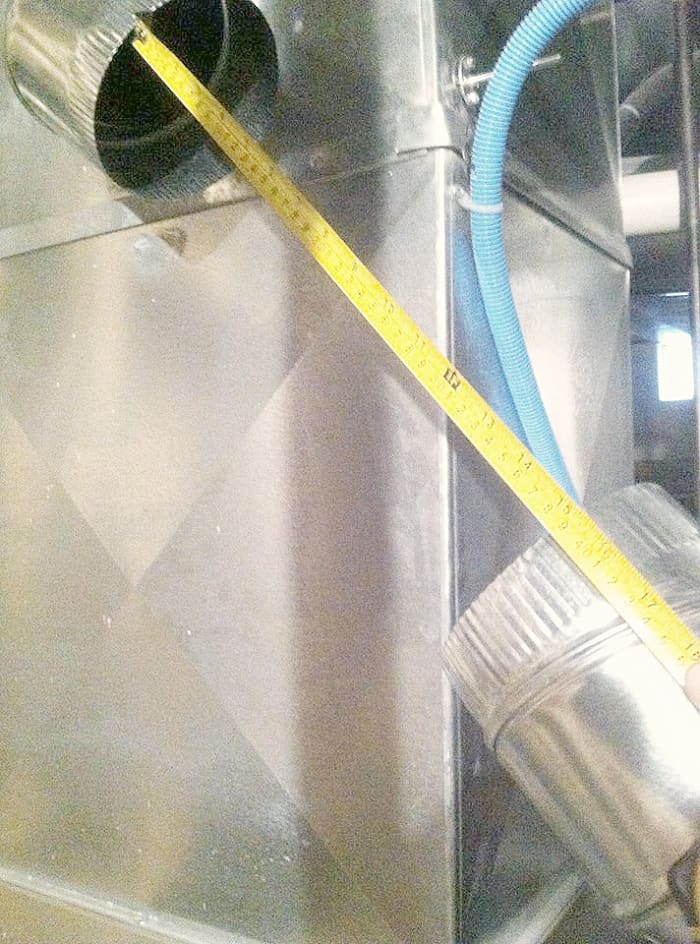
Measure to cut your 6" warm air pipe to fit and cease up your bypass. Remember, border to edge plus iii".
Cre8tor
- Assuming you have ac or a high-efficiency furnace, you can easily tap into i of those 3/four" lines by cut in a "tee" and running your pipe from in that location to the humidifier.
- Yous tin measure border to border plus 1" to become your cuts for straight piping.
- Be sure to glue each joint and secure the piping to the furnace or duct with 1/ii" screws.
- You can utilise pieces of your chip metal for strapping.
- If y'all don't take a drain already, you can run the pipe along the flooring to a laundry bleed, or y'all'll have to add a condensate pump to pump the water to its destination.
Finish the bypass by taping the joints and installing 2 screws to each articulation.
Cre8tor
Tap into existing drains.
Cre8tor
Tap into the drain by cutting in a "tee".
Cre8tor
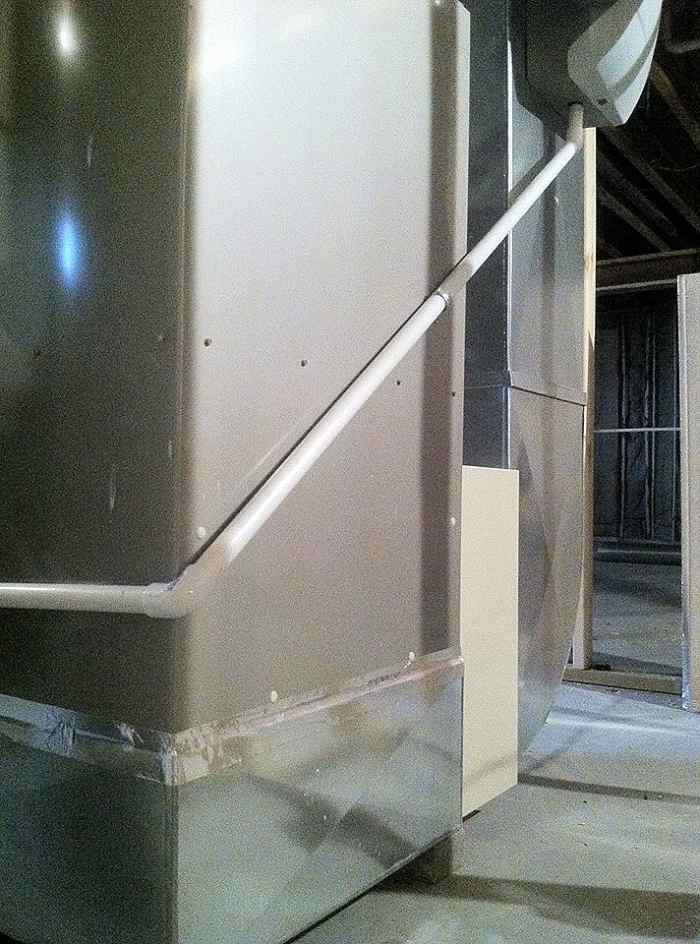
Install PVC drain betwixt "tee" and humidifier with the path of to the lowest degree resistance.
Cre8tor
Be sure to glue the fittings and secure the pipe.
Cre8tor
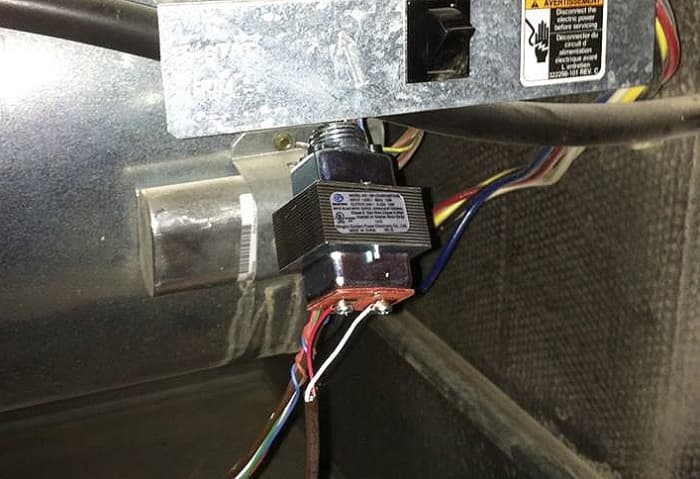
eight. Connect your transformer. *Make sure the unit of measurement is powered off.*
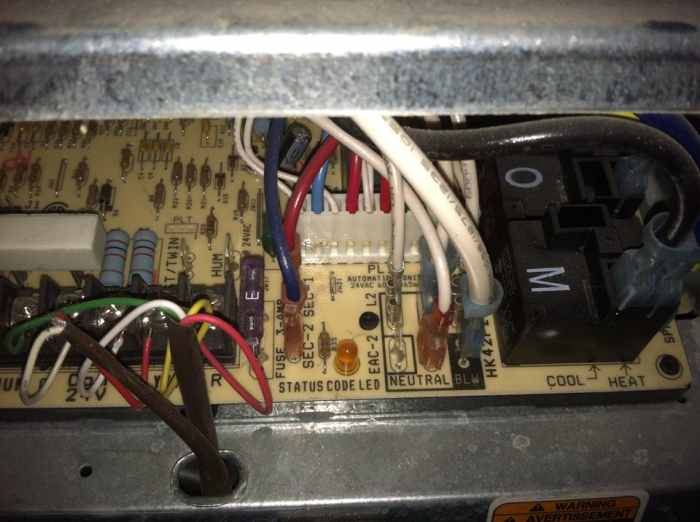
Cre8tor
- Modern furnaces have terminals on the circuit board marked HUM and NEUTRAL for easier humidifier hook up.
- Be sure you don't tie into the 24V common by mistake. The NEUTRAL is for 110V use.
- Use pliers to clasp your spade connectors onto the transformer's black and white wires.
- Then, but securely press the black connector onto the HUM terminal and the white connector onto the NEUTRAL.
- If you don't have these terminals, you'll have to tap into another 110V source using wire nuts.
Humidifier Wiring Diagram
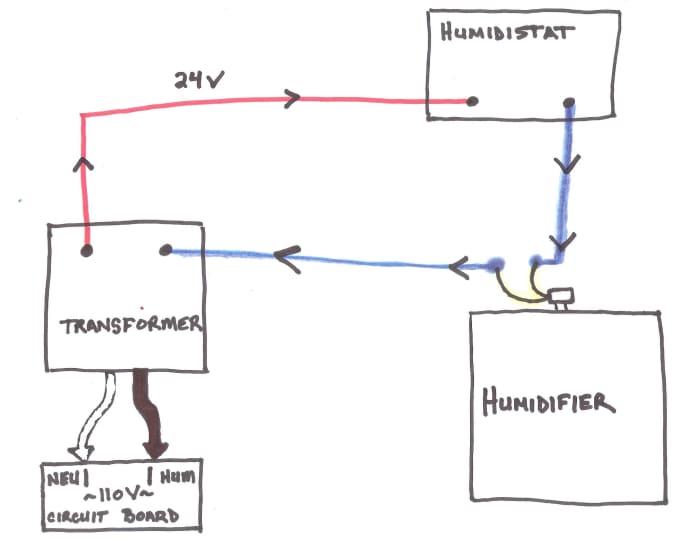
The 24V humidifier wiring is done in a very simple series.
Cre8tor

Put your spade connectors on to your transformer wires.
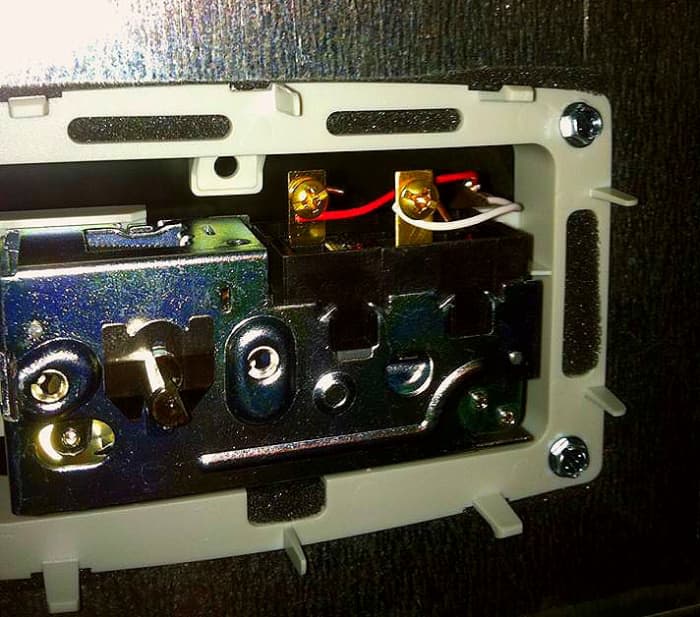
Cre8tor
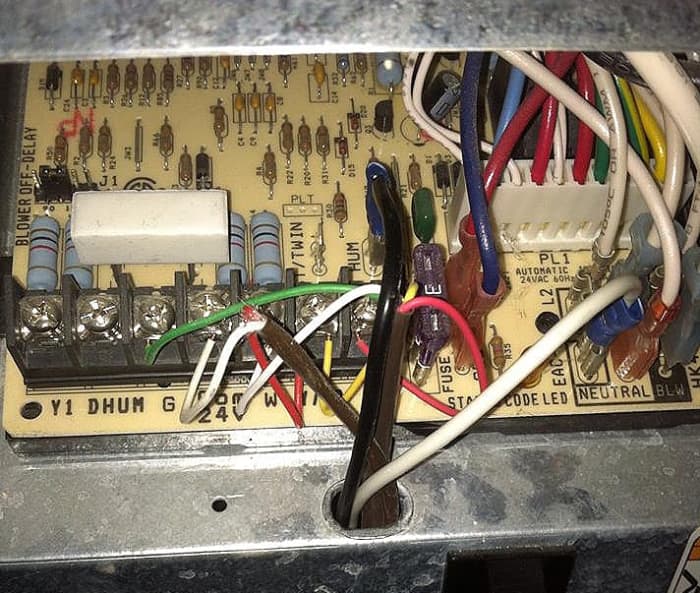
Carefully push the spade connectors onto the circuit board. Black to HUM and white to the 110V Neutral.
Cre8tor
9. Run the thermostat wiring (low-voltage wiring).
Connect your red and white low-voltage wires to the transformer. Information technology doesn't matter which color goes to which side; just recall where they're going.
Cre8tor
I have called to run most of my wiring through my ductwork, in this example, because it keeps it protected and looks much neater. However, with so many options and situations, I've provided photos and a wiring diagram that I believe will requite you lot a improve idea of how to tackle your specific needs. Merely keep this in mind:
- Any wiring exterior of the duct from the ceiling down should be protected by some sort of flexible conduit.
- Don't let the wire rub on precipitous edges.
- Brand sure you make good connections. Don't over tighten, but be sure the wire is secure in whatsoever terminal type you're using.
Here are the connections to the humidifier control. Red is from the transformer and white goes to the humidifier.
Cre8tor
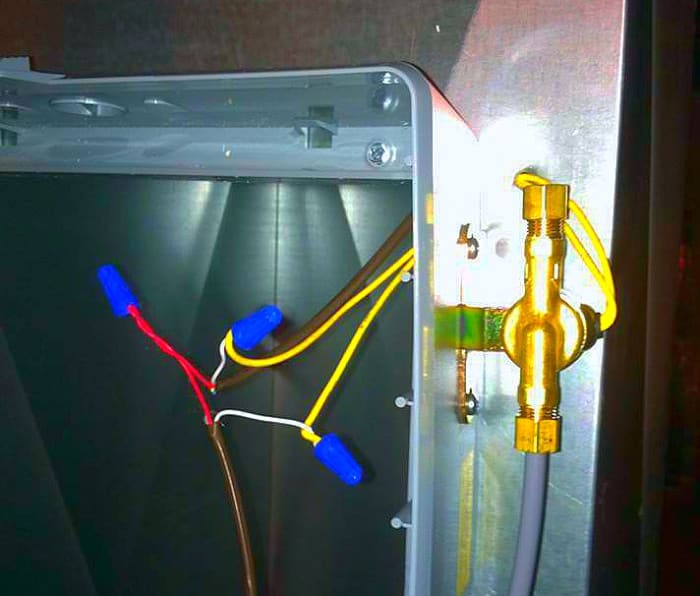
I poked a pigsty in the duct and inserted the wires from the humidifier to hide my connections. White is from the humidistat to humidifier unit and from unit back to the transformer. Red is just a continuation from the transformer to humidistat.
Cre8tor

Here, I protected my wiring from the duct to the furnace.
Cre8tor
ten. Install the water line and valve.
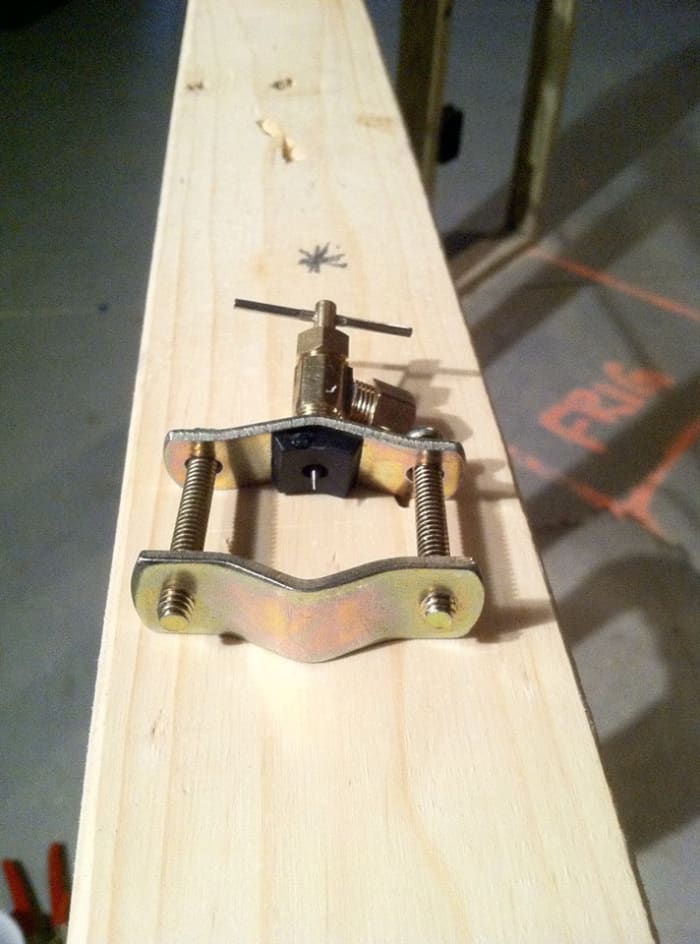
Find how the needle is recessed into the safety gasket and that the gasket is seated on the valve and then that the curvature of the two lucifer up.
Cre8tor
Again, I think the photos will aid you the most, so as you look at those, keep in heed:
- Make certain the prophylactic gasket is seated properly, the "tee" handle is tightened to the mounting bracket, and the valve needle is retracted when mounting the valve to the hot water line.
- Don't over tighten anything, and use two pairs of pliers to make sure yous don't twist things as you tighten.
- In one case yous've cut the line and completed the install of it, twist the valve "tee" handle all the style downward to pierce the chief and then loosen it to open the valve and allow water to menstruum to the humidifier.
- Make sure you know where the nearest h2o shut off is.
In case at that place is a problem once you pierce the line, you'll have to shut off the h2o to that piping to end the leak and fix the outcome. It is probably just a matter of tightening the connections a chip more than, just worst instance scenario—you tin can install an inline valve and make the repair to the chief at the same fourth dimension using push fittings. Unproblematic as pie.
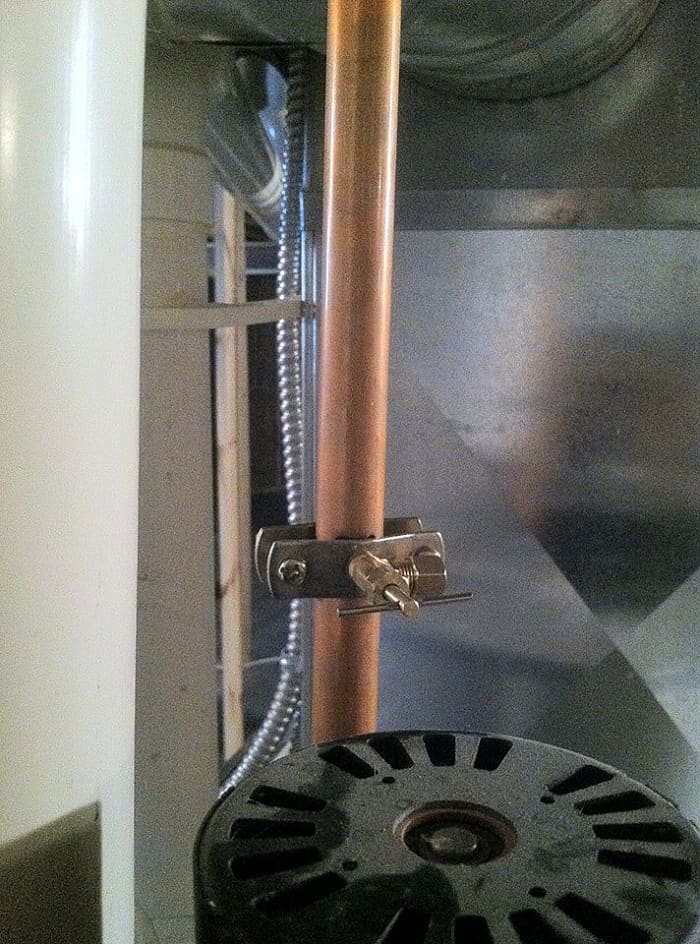
Install the saddle valve on the hot h2o line with the discharge pointing toward the humidifier. Be sure everything is securely tightened but non overtightened.
Cre8tor
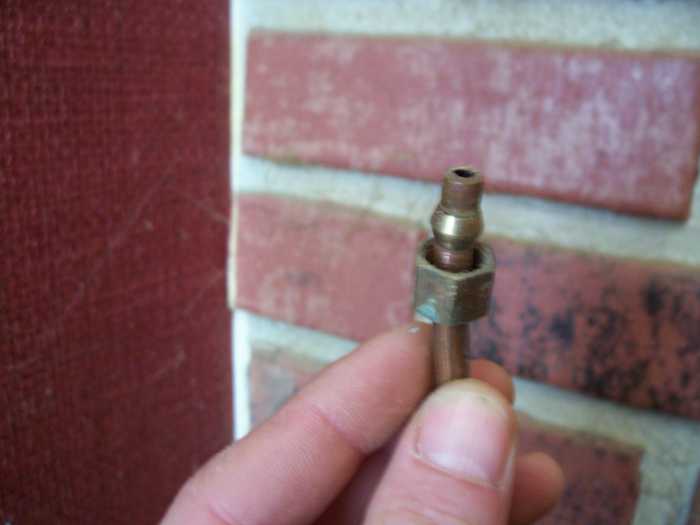
This is how you lot place the nut and ferule onto the 1/4" water line you are nearly to connect.
Cre8tor
11. Re-install the water feed tube, panel and humidistat cover.
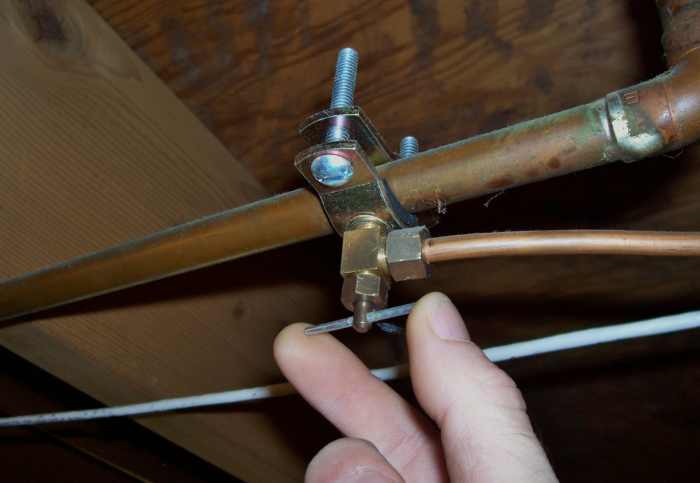
Cre8tor
- Identify the tube in the valve.
- Slide the nut and ferrule up to the valve
- Tighten the two by using i plier to hold the valve and the other to tighten the nut.
- With the tube connected, tighten the valve down to pierce the primary.
- Then, loosen information technology to let water to flow.
Cre8tor
- Insert the feed tube into the h2o panel housing where information technology was
- Snap the panel back into the humidifier by putting the bottom in first and snapping the top back into the humidifier housing.
- The humidistat cover will also merely snap into identify.
- Put the knob back on the control post. The knob only goes on ane style.
12. Run a test cycle.

Run a test wheel and replace the cover. Your humidifier installation is washed if the exam cycle was good.
Cre8tor
- Make certain the ability to the furnace is turned back on and that the main thermostat is set high enough to make the furnace run.
- Place the doors back onto the furnace and plow the humidistat all the fashion upwardly or to the "examination" marking.
- Within a minute or so, you should hear the "click" of the humidifier'south solenoid valve opening and the water flowing into the water console.
- Y'all tin remove the hose to run into if the h2o is coming, but when you do, make sure yous point it at the console near the bottom to catch the water.
- If all is well, replace the comprehend on the humidifier and accommodate your humidity command to your liking.
Setting and Controlling the Humidity Level
In one case your humidifier installation is complete—and you've checked that all of your plumbing connections are leak free—y'all tin can run a exam to brand certain it'southward operating properly and set up your desired humidity level.
Turn the humidistat all the way upwardly or to the "test" level. This will force the unit to operate. You tin can confirm this past listening for the "click" of the solenoid valve open up and for the flow of water and drainage coming from the unit of measurement.
The recommended starting setting volition vary a bit based on the region you lot're in. That being said, 35-45% is the suggested range for most of us, but we want to ease into that. Start at 30% and allow the humidity settle into the dwelling before deciding to make adjustments.
Call up that things volition begin to expand and soak upward the initial humidity, so you won't become a true feel for what the proper level is until y'all let the unit work for a while and equilibrate. Consider waiting four-5 days earlier fine-tuning the settings.
Tips for making adjustments:
- Do a little at a time. You'd be surprised how much 1 or 2% tin brand a divergence.
- If windows and horizontal surfaces feel damp, the level is too high. This tin can cause wood to accept in too much humidity and water ice to form on windows.
- If static is even so keeping you from wanting to be almost your loved ones, and you feel that the air is still dry, the level is likely also depression. You should crash-land upwards your humidistat until yous're comfortable (without making your home too damp).
- One time yous discover a level that you're comfortable with, marker it on the humidistat so that when you shut down the humidifier for the summer, yous'll know where to set up it over again when cold weather swings back in.
Improve Your Air Quality Even More
- How to Make clean Air Ventilation Ducts Yourself
Cleaner duct piece of work equals cleaner air and less dusting. Learn how you can improve the quality of the air in your home without whatsoever cost and specialized tools.
Basic Humidifier Maintenance and Parts
One of the all-time things virtually humidifiers is that they're so simple to maintain and there are only a couple of working parts.
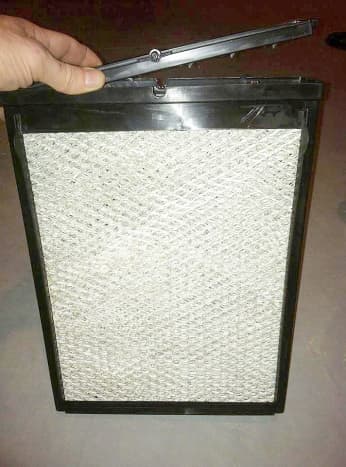
Beneath are photos of these parts equally well as a brief description of each one for easy reference, should yous need them. As far as maintenance goes, only supercede your water console as needed.
A water panel doesn't have an exact lifespan. It largely depends on the h2o that it uses and the home that it's in. Be sure to check it for mineral build-up and/or deterioration. These are signs that your water console needs replacing.
Other than that, call up: When we have plenty of summertime humidity, and we desire our humidifier close down, plow your humidistat all the way down or off, and shut the featherbed damper betwixt the unit and the plenum (turn it to "summertime").
This may be a proficient fourth dimension to supercede your water pad or panel since it'due south also a good time to replace your furnace filter with spring coming.
Tip: Change your filters afterward you lot do your spring cleaning since you'll likely exist stirring up dust.
Humidifier Parts
Aprilaire 600M Humidifier Kit Review
This Concludes Our Session of Humidifier 101
Mayhap this is more than y'all ever wanted to know virtually humidifiers, but I wanted to provide a complete guide, non just on installing a whole-house humidifier but besides all the things that go with information technology.
Whether information technology be the Aprilaire unit I used in this example or whatsoever other humidifier brand, all of this data is applicable, and the projection should only take about four hours to complete for the average homeowner.
This article is accurate and truthful to the all-time of the writer's knowledge. Content is for informational or entertainment purposes just and does not substitute for personal counsel or professional advice in business, financial, legal, or technical matters.
Questions & Answers
Question: Tin the 600 be installed on a horizontal furnace in a home that's 1,340 square feet?
Answer: Aye. Your transmission should show that. If you don't have ane, you can probably find it on the internet.
© 2022 Dan Reed
B_Erie on January 19, 2022:
Hi Dan,
Great write up, very helpful!
I have everything hooked upwardly as you described. Just not getting ability to the solenoid. I am wondering if it'southward the 24v converter. I have information technology hooked upward to the HUM and NEUTRAL equally yous describe. I did notice however that on my furnace circuit board, next to HUM it says 24v. Wondering if it is already at 24v, and the converter isn't needed? Or do you recollect I just demand to tap into a different power source?
Nuno Freire on December 11, 2022:
Will this setup run the humidifier if only the blower is on and not the heat. I would like the humidifier to run when the fan comes on independent of the heat.
Brian can on January 02, 2022:
I put a new powerd Apr air on and my hum numbers are existent low. I have skillful h2o flow
Dan Reed (author) on October sixteen, 2022:
The drain must be at the lesser or all the water will run all over the place.
Dave on October xiii, 2022:
Hey Dan - is it an issue to install a humidifier horizontally?
Dan Reed (writer) on September 05, 2022:
Shiva - it is different because you lot accept an outdoor sensor you have to wire in only your instructions should tell y'all how to do so in your specific awarding.
Shiva on September 04, 2022:
Hello Dan. Cheers for the instructions. They are very helpful. I accept bought the same humidifier but with automated humidistat control [600 model]. Is the wiring to the humidistat is any different or it is the aforementioned?
Dan Reed (writer) on March 07, 2022:
Jayme - Aye. You can install a humidifier on ductboard and as long as it'southward installed proper you'll be fine only that goes for any install.
Jayme on March 07, 2022:
Tin can you install on installation foam board every bit I don't have metal ductwork.
Dan Reed (author) on February nineteen, 2022:
I actually can't say for sure on a specific board but I do know the neutrals are ofttimes sectioned off on their own sort of and if they are all occupied there spade terminal splitters you tin get that volition turn a unmarried into a double.
Dan Reed (author) on February 19, 2022:
There should exist a neutral section on the board that'due south common to all the 110 circuits, it just may not be located right in that location past the HUM terminal.
Eric on February 15, 2022:
Follow up to my last post, the circuit board is a Nordyne 624790-A for reference. In the corner of the board, information technology has ii terminals labeled "LINE Northward" and a final labeled "XFMR N", are these the defended neutrals I tin hook up to? (all 3 are currently in use) If and then, does it affair which one I hook upwards to?
Eric on February fifteen, 2022:
I accept the Aprilaire 500m unit of measurement. My circuit board has the HUM (110v) terminal but no neutral terminal. Where else tin I claw the white wire from the transformer?
Dan Reed (author) on February 04, 2022:
It sounds like you have an upgraded model. Keep in heed the case in my article is using a 600M...a very simple unit. You should take wiring diagrams in with the unit you lot bought that will help with yours.
Aprilaire on February 03, 2022:
Thank you for putting and so much effort into this article. Helps but information technology however didn't work. I have on my April aire humidistat r,c,w,h,h,gf,a,b, one thousand,odt
So the diagram doesn't workout.
I bypassed information technology for now so it volition run. Whatever suggestions will assist
Dan Reed (author) on February 15, 2022:
Yes but not much and your installation guide should help yous with the outdoor sensor wiring. I don't remember off the peak of my head however I know it's quite elementary. The remainder of the wiring is basically a circle going from the furnace to the stat (red), from there to the humidifier solenoid (crimson still) and back to the furnace (white/common). The stat acts equally a switch triggered by the humidity reading so that it won't come on unless the humidity is less than what you a setting it to phone call for then the 24v just goes to the stat when the rut comes on but only makes information technology to the solenoid if the stat then "closes the bridge" assuasive information technology to pass to the valve and then information technology volition open. This is where the work is done so it and then sends the negative voltage back to the common on the furnace and that's it.
Kenny on Feb fifteen, 2022:
Thank you soo much. Very helpful. Merely the wiring nonetheless confuses Me. I take an automated 500 aprilaire with exterior temperature. Will wiring exist dissimilar for me.
Dan Reed (author) on March 04, 2022:
Hello Millionaire Tips. The only time you have to worry nearly mold with a humidifier is if it's not used properly. People who say their humidifier caused mold normally take information technology ready also high and/or forget to shit it down in the winter. Similar most products, it just takes proper intendance...I highly recommend having a humidifier. It's one of the most beneficial of hvac accessories and affordable. Cheers for reading!
Shasta Matova from USA on March 03, 2022:
Congratulations on being 1 of the elevation 10 hubs for Friday. I've seen advertisements for the Aprilaire humidifier, and have been seriously tempted. Exercise you have to worry about mold with a humidifier?

Source: https://dengarden.com/home-improvement/Humidifier-Installing-An-AprilAire-Whole-House-Humidifier
Posted by: heardarithe.blogspot.com
0 Response to "How To Install A Humidifier On Your Furnace"
Post a Comment